My Garden Planting – The Good, The Bad & The Ugly (Part 1)

It’s just over a year since I started planting up our new garden from scratch so I thought I’d write a series of blogs on how successful it’s been; partly as an aide memoir for my rapidly aging brain.

So, which plants performed well and which didn’t? What have been the star plants and what disappointed? What problems have I had to overcome? And what editing am I going to do?  (Aside… actually, I have already started editing. If you don’t like a plant or it’s getting on your nerves for one reason or another, rip it out and replace it! Call me callous if you like but I find my level of sentimentality towards a plant generally depends on how much I paid for it!) Before I go any further and whilst I’m in controversial territory…. Health Warning: organic gardeners (by which I mean people who garden organically of course) may be offended by parts of this post!

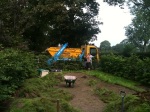
First… here’s a reminder of how the garden looked before any plants went in, then how it looked when most of the shrubs/evergreens had been planted. Regular readers may remember the horror of the box balls which were replaced with Taxus. I did lose one Taxus ball, I think because it never got established and was not helped by the ants’ nest under it! But my supplier replaced it for free, hooray!

And  below is what it looked like by 3 May 2012 when most of the perennials had gone in.

3 May 2012 – click for larger image

I wanted the perennial plants along the path to be mainly evergreen so after a lot of umming, ahhing and head scratching, eventually I settled on the green Heuchera ‘White Spires’ (which as its name suggests has white flowers) sourced from local specialist growers ‘Plantagogo’ ), the grass Carex ‘Everest’ and the white flowering Geranium maculatum f. albiflorum; sourced from the lovely Sue Beesley’s fab Bluebell Cottage Gardens Nursery along with a lot of my other perennials. I am so grateful to Sue for all her patience and advice!

I’ve been very pleased with the combination of these three plants. When the Heuchera and geranium are in flower they provide a wonderfully airy and frothy effect along the path which is delightful! Now I know Heuchera are not everyone’s tasse de thé but they fulfil all and more of my criteria for selecting plants; a) they are evergreen so provide year round interest (oh for more evergreen perennials!) b) they’re easy to please and are low maintenance, c) there are many different colours and varieties for sun, shade or both, d) slugs don’t eat them and they’re mainly pest and disease-free – apart from vine weevils and what follows!

Heuchera ‘White Spires’, Carex ‘Everest’ & Geranium maculatum f. albiflorum along edge of path

The Heuchera ‘White Spires’ flowered prolifically but before the plants had chance to bulk up, which meant some flower spikes keeled over. And the geranium didn’t flower very much so here’s hoping they will next spring! Overall I love the combination so it will be staying!

Having invested heavily in Heuchera the last thing I wanted was to lose them to vine weevil, so I decided on a ‘be prepared’ approach and ordered the appropriate nematodes online.   Then disaster struck! In mid-September nearly all of my Heuchera succumbed to Heuchera rust.  I defoliated them and also sprayed with Bayer Garden Systhane Fungus Fighter which seems to have done the trick. I did lose one plant and will replace it next spring.

But I am not deterred as the Heuchera have been real stars! The dark purple varieties I chose (‘Obsidian’ and ‘Dark Secret’) have been planted to create rhythm in the garden and they contrast beautifully with white flowering plants and harmonise with purple flowers and purple leafed shrubs. The star of the two is definitely ‘Dark Secret’; again sourced from Plantagogo, and these did NOT get rust!

Heuchera ‘Dark Secret’ with Geranium phaeum album & Sambucus nigra ‘Black Lace’

Both dark varieties have flowered their socks off since spring and are still flowering in November! But I prefer the crinkled leaves of ‘Dark Secret’ and its flowers, which are more substantial and a better white than those of ‘Obsidian’, and are borne on sturdy stems that are a lovely dark purple. Sometimes the flower stems grow to 3 feet or more and the bees absolutely love the flowers!

Oh dear, this post seems to have become rather Heuchera-centric and a depressing tale of woe! Though it is true that serious gardening is not for the fainthearted or anyone traumatised by creepy crawlers and wriggly things. In case you fall into this category, I’ll put the rest of the ‘icky stuff’ at the end so you don’t have to read it.

In spite of the above, on the whole the garden is a great success and we got so much pleasure from it this year (and Beloved seemed quite impressed!)  So I’ll leave you with a few pictures. Ta ta for now!

Mid July 2012

Clematis ‘Etoile Violette’ – a real star of a plant!

Purple Salvia ‘Caradonna’ (another star plant), Echinacea ‘Kim’s Knee High’, the aforementioned Leucanthemum (now gone) with Cosmos ‘Purity’ & Nicotiana ‘Lime Green’ both grown from seed

August – I really shouldn’t have worried that the garden wouldn’t look ‘full enough’ this year; because of all the rain everything went nuts!

Aqulegia ‘Sulpur Dark Purple’ another star plant that flowered from April to late August

Asiatic white lilies with Euonymus ‘Kathy’, Heuchera ‘Obsidian’ & Cotinus ‘Royal Purple (rear) taken in June

August effusiveness!

Pests & Diseases (a.k.a. the ‘icky stuff)

Ants: Love my garden! They’re supposed to be more of a nuisance than an outright plant pest, but they do seem to like nesting in plant roots. As it’s more or less impossible to rid them from the garden I treated each nest I found with ant powder which in the end seemed fairly effective.

Aphids: Woolly variety on beech hedge (but now the hedge is established I left it to fend for itself, which it did). Greenfly on climbing roses (sprayed a little but not too much of a problem) but the devils did pretty much destroy my sweet peas, which was sad when I’d taken the trouble to grow them from seed! Blackfly on some shrubs (sprayed a bit, pruned a bit where infestations caused deformity of leaves) and huge infestations on Leucanthemums. So partly because of that and partly because I decided I really disliked the ‘mums’, I ripped them out and binned them (see paragraph 2!)

Astrantia Leaf Spot: Affected some of my Astrantia in very late summer. I sought advice from twitter gardening friends and, as advised by the lovely @VergetteGardens, cut the plants back (carefully disposing of diseased material) and mulched around them to prevent water splash back in wet weather. Sadly I don’t think this will be the end of the story.

Lily Beetle: A few on my Asiatic lilies, easily dealt with through vigilance and squishing (sorry!) I don’t have any fratillaries and fortunately they don’t attack Hemmerocalis!

Mildew: On clematis leaves and some geraniums (partly dealt with by pruning & partly by spraying)

Moles: We have massive mole problems here in Cheshire. One has decided to tunnel along the front of our house and under our front lawn this year – but I just clear up the mess and firm the molehills down. I also had one in one of my back garden borders which partially uprooted some plants, but I just firmed them back in. I just don’t have the heart or the stomach to use traps!

Slugs & Snails: Considering I have a north facing garden and the wet year we’ve had – surprisingly low levels. I use pellets (sorry again!) particularly around new plants that may be susceptible but otherwise tolerate them.

Vine Weevil: Have already been covered above. I spotted a few adults and will let you know next year if the nematodes worked!

My Garden – Planting – It’s getting exciting!

So spring has sprung.. or at least it’s springing! I’m not quite sure why new shoots and buds are so exciting but to all gardeners they really are! And in these times of ‘weird weather’ they are also, of course, a sign that a plant has survived the winter. Which I’m very happy to say is the case with all the plants that I planted in my garden last November and December. Hooray!

So before I get carried away with spring and planting lots of perennials I thought I’d do a recap on where I’m up to with my garden and the plants that I’ve already put in and why. You may need a whole pot of tea/coffee and a slice or two of cake to get through this one!

As I said in my last blog I want lots of permanent evergreen structure so when we look out of the lounge or kitchen window on a winter’s day there’s still plenty to see. And it has worked! Even though there’s still a lot of bare earth, we’ve been very grateful for the evergreens this winter and the Taxus topiary balls looked lovely with little snow hats! Some of the evergreens echo the overall formal design; Taxus (yew) topiary balls, Taxus baccata fastigiata (Irish yew), box hedging and Ilex aquifolium aureomarginata (holly) half-standards in stone planters.

I intend the rest of the planting to be informal and am trying to incorporate contrasts in form, texture and the shades of the greens. And, as I’m going for a mainly restrained, romantic, cool colour palette, I have restricted any variegation to white. Almost all the deciduous shrubs have purple foliage, so hopefully they will really change the look of the garden when they come into leaf – although they are an experiment in such a shady garden and may not produce the dramatic contrast in foliage that I have in my ideal mind’s eye!

So here’s a summary of the remainder of the plants that are in so far – the photos aren’t the best but I hope they give you a good idea.

Bed 1 – Left hand bed nearest house – Mainly shade. Rear of bed (left to right): Mahonia x media ‘Charity’ (architectural, winter colour, scent), underplanting – Pachysandra terminalis (evergreen, ground cover) Gap left for a Hydrangea – possibly the compact, green-flowered ‘Bombshell’, Choisya x dewitteana ‘Aztec Pearl’ (white flowers, scent) & Physocarpus opulifolius ‘Diabolo’ (purple foliage, pale pink but unobtrusive flowers) you can’t see it in the pic, but it is there!

Bed 1 – Mid bed – Viburnum davidii (low growing, mounded form – visual anchor), Helleborus argutifolius (glaucous architectural foliage, white to pale green flowers) & Euonymus ‘Kathy’ (upright larger leafed form with white-edged foliage).

Bed 2 – Left hand bed furthest from house – Mainly shade. Rear of bed (bottom to top): Sambucus nigra ‘Black Lace’ (disected purple foliage – unobtrusive flowers), Aucuba japonica ‘Rozannie’ (plain dark green glossy foliage), more Pachysandra underplanting. Gap for another white flowering Hydrangea – though I may change my mind! Skimmia confusa ‘Kew Green’ (compact, mounded shape for the corner – can you tell I like green flowers?!).  Mid bed: Euonymus ‘Kathy’ & Viburnum davidii repeated.

Bed 3 – Right hand bed furthest from house. Sunniest bed. Rear of bed (left to right): Cotinus coggygria ‘Royal Purple’ (purple lollipop foliage, unobtrustive flowers), Cornus alba ‘Sibirica Variegata’ (white/cream edged foliage, winter stem interest), Eleagnus x ebbingei (glaucous foliage – am intending some silver plants in this bed), Osmanthus x burkwoodii (dark green foliage, white scented flowers in spring). Mid bed: Gap on left for something small and evergreen, right; Euonymus (you guessed it) ‘Kathy’ repeated.

Bed 4 – Right hand bed nearest house. Mainly shade/some sun. Rear of bed (left to right): Aucuba japonica ‘Rozannie’ repeated, Acanthus mollis ‘Alba’ (architectural foliage and flower spikes, white form), Viburnum tinus ‘Eve Price’ (long flowering period winter & spring, pale pink to white), Sambucus nigra ‘Black Lace’ repeated. Mid bed: Left – gap for something evergreen, right; it’s that ‘Kathy’ again!

And… (nearly there now, phew.. plant Marathon!) last but not least please meet the climbers, which have been planted on each side of both arches…

the evergreen honeysuckle – Lonicera japonica ‘Halliana’ (to permanently ‘clothe’ the arches, white & pale yellow flowers, scent), Rosa ‘Madame Alfred Carrière’ (almost white flowers, shade tolerant, free flowering, scent) & Clematis ‘Etoile Violette’ (masses of deep purple flowers late summer & reliable) hopefully looking yummy with Mrs A. C.!

I’ve tried to use my head a little more than my heart by choosing shrubs that will provide a good permanent structure and a foil for the flowering perennials  without their own flowers imposing themselves too much. Well, that’s the theory anyway! Happy spring everyone!!

My Garden – Planting Phase 1 – and a load of balls!

So finally, it’s looking more like a garden! What’s that I hear? Mutterings of, “About flipping time too” ?! Yeah well, if it was all done at once there’d be nothing to look forward to would there? Not to mention an excuse for my Twitter gardening buddies to prod me encouragingly about ‘how much better it will look when the plants are in’ – yes, you know who you are!

The first phase of the planting is in and I’ve pretty much achieved what I wanted to get done this year. By ‘first phase’, I mean that I decided to approach the planting by starting with the permanent structure of evergreens and other shrubs.

Of course, this highly sensible approach should have included doing a planting plan on paper but somehow I just never got round to it. Instead I opted for the really organised and well known system of making plant lists in my head and on various, now dog-eared, bits of paper. Obviously, when it comes to clients’ designs, I am totally organised and the bits of paper get put into a file (wink).

The ‘feel’ and style I’m going for is cool (in the colour sense) romantic and sophisticated – whether I achieve it or not remains to be seen! I settled on a limited colour palette of mainly white and purple flowers (in spring and early summer) with some injection of yellows and oranges (in late summer, autumn and winter). I also decided to restrict the shrub foliage to dark green, silver and purple with any variegation also being white. In addition, I’m trying to achieve the right balance between formal and informal. And as we don’t actually sit in the garden all that much I wanted to include lots of evergreens so it’ll look good all year round when viewed from our windows. I always build in around a third evergreen, but our garden will be fifty per cent, or more, evergreen.

So, starting with the formal, I planted sixteen box topiary balls on the angled corners of the four beds and was really pleased with how they looked…


Sadly this was not to last and turned into a ‘bit of a saga’.  The box was fine for a few weeks but then started shedding leaves like nobody’s business and ended up looking like this…

Poorly box… all say ‘ahhhh’

Sincere apologies for the distressing close-up


I suspected it was the dreaded ‘B’ disease (whispers… “blight”) and kicked myself for not quarantining the plants for longer before planting them.  Whether it was or wasn’t blight, it clearly wasn’t good! My supplier was very apologetic, gave me a refund and sent someone to collect the poor plants. So the box is deceased, it is no more, it is ex-box!

On the plus side this sorry episode actually did me, or rather my design, a favour.  I decided my nerves couldn’t stand the worry of more box balls (although I have included box hedging elsewhere) so decided to replace them with Taxus balls. However as yew is slower growing, darker green, more solid looking and a lot more painful on the pocket, I decided to buy only eight slightly larger specimens and to plant them in lines either side of the path.  This has the effect of leading the eye along the central axis…

Central axis - now with Taxus balls

To complete the formal elements, I’ve planted half-standard Ilex aquifilium ‘Argentea Marginata’ in the two stone planters at the bottom of the garden framing the seating area, a column of yew (Taxus baccata ‘Fastigiata’) at the centre of each bed, currently babies, but they’ll grow… eventually! And… box hedging around the central birdbath feature – fingers crossed eh?!


There are already 67 plants in the garden – deceptive isn’t it!

Well that’s an overview of where I’m up to. I’m quite pleased with it so far and am really enjoying creating it.  I was going to go into the rest of what I’ve planted in more detail but think that’s best left for another blog when I’ve got my Latin head on – plus it’s time for tea!

Lord grant me patience… but please hurry!

Well, it’s been three weeks since the hard landscaping was finished in my garden (feels more  like three months!) and it still looks like this…

except with more weeds, but that is with good reason. I’m n0t-very-patiently waiting for weeds to come through so that they can be sprayed.  Then, of course, I have to wait another four weeks before I can plant anything.  I know this is the ‘sensible’ thing to do as we have some pretty nasty weeds but honestly, it’s enough to try the patience of the saintliest of saints!  My landscaper should be able to spray very soon now but knowing my luck we’ll have weeks of windy weather!

In the meantime I have been planning and ordering ‘stuff’, which feels like some sort of progress at least.

I managed to snap up sixteen 20″ box balls at the brilliant price of £9.60 each which my plant supplier is kindly reserving for me and also ordered two half standard Ilex aquifolium ‘Argentea Marginata’ for the stone planters.  Next is to design the rest of the planting scheme for the beds. I’ve started a plant list and if anyone knows how to get two or more plants to occupy the same piece of ground I’d be terribly grateful if you could let me into the secret!

Other purchases have been two of these ‘Monet’ arches to be installed laterally at each side of the central axis to provide vertical interest and, of course, a framework for climing plants…

However they’re currently languishing in the garage – one half constructed – because I forgot to take into account the generous width of mortar under the path edging which will have to be drilled before they can be installed – then they will fit perfectly! I have a romantic vision of them covered in white climbing roses but in a north-west facing garden that could present a challenge!

Also, having sensibly dismissed the idea of spending over £2,000 on my ‘dream bench’ for the bottom of the garden or getting one made by a joiner for £850 (I hate being sensible!) we compromised and ordered one of a similar design in the autumn sales for approximately a third of the price – this is it…Not my dream bench but still very nice

And as my lovely OH has just taken up arms, i.e. a screwdriver,  I’m off to join him and said bench in the garage to assist (supervise) its construction. See… progress!

(A short time passes with no swearing and no bashed fingers)

Update… and here’s the actual bench in our garden – I’m very pleased with the quality and the look of it and it went together beautifully.

Our lovely new bench in-situ

My Garden Build – Day 16 – It’s Finished!

Peace has decended. No more the drone of the concrete mixer, no more the shrill whine of the angle grinder, no more overheard landscaper’s laddish banter and badly tuned radio… and no more flippin tea making!  The hard landscaping is finished!!
 
To further test my ever-diminishing patience there were a few days of ‘nothing happening whatsoever’  last week, while my landscaper awaited delivery of some final materials; namely, an inspection hole tray and specially fabricated metal edging to go around the birdbath – made by his local blacksmith….
 

Inspection hole tray fitted with blocks, very boring but a lot better than a horrible concrete or plastic cover


Metal edging fabricated by the blacksmith to retain gravel from planting area for box hedging - very neat & smart and way easier than using Ever-Edge in this situation


Sharp sand is brushed between the pavers...


...and the gravel is laid (small grade Cheshire pink)


The tools and building materials were packed away, the stone planters were put in place, the skip was collected by ‘Bill & Ben’ the skip hire men (I kid you not!) one last round of tea was made, the wire was replaced on the fence to close up the access point and they were gone.
 
This is, of course, just the beginning of the exciting process of creating a garden. But it is a real joy to have a good basic structure.  I know the design is simple; some may think it very boring but I love it and my Other Half loves it too. What I am absolutely delighted with are the materials we’ve used as I think they’re very sympathetic with our house and its rural location.  It also meets my own brief of being low maintenance and easily accessible. And, of course, there are other things to add, a bench, side arches for climbers to create two arbors and planters.
 
Oh and, if anyone else says to me they ‘can’t wait to see it with the plants in’ I might scream and throw something!  You can’t wait?! How d’ya think I feel! I’ve learnt one thing for sure; patience is definitely not a virtue I possess!
 
So, as is always the custom with these things, here’s an obligatory ‘before’ picture…
  

Before Landscaping

 And after pictures. Ta da!!

After landscaping - view towards the house


After landscaping - view from the house


My Garden Build – Picture Blog – Days 12 – 15 – The calm before & after the sandstorm!

Finally the finishing post is in sight. Well.. as far as the hard landscaping goes anyway.  And we’ve mainly had excellent weather for it!

Day 12 - Landscaper arrived later than usual having gone to source more reclaimed stone, this time for our new step out of the house

It’s been an interesting few days with a some ‘eeeek!’ moments. Progress has felt rather slow – probably due to my growing impatience at wanting to get it finished! Anyway, on with the pictures, hope you enjoy.

Day 12 - Start of step construction - ready for the stone coping

Managed to source a fab reclaimed millstone at a very reasonable price to sink into the paving as a feature

Day 13 - As we have plenty of pavers, I decided to have a paved area at the bottom of the garden (rather than just gravel) where the bench will go


Day 13 - Paving completed; just imagining my 'dream bench' here now!


Day 13 - Progress by the end of the day; millstone in place but not at right level yet. We were rather unprepared for what happened next!


Day 13 - early evening - no, that's not a Cyberman in our garden, it's the sandblasting man!


He looked very pleased with his achievement - but look at the mess! The garden looked like something from a moon-landing!


Day 14 - Stone coping is cut & installed to complete the step


Progress by the end of day 14


Sunday 21 August - NOT a day of rest. The OH and I spent 5 hours sealing all of the new paving (with paintbrushes!). Hopefully worthwhile as the garden is North-West facing & attracts a lot of algae & moss growth. I also pruned the hedge!


Day 15 - Garden is cleared of landscapers' clutter & the beds are dug, hurrah!


Day 15 - All of beds dug - birdbath making a handy coat rack... sigh


So here we are by the end of day 15 - just a few tiny bits to do before the gravel can be laid. Getting there!


My Garden Build – Picture Blog – Days 9 to 11 – We have shapes!

 Although the back garden still looks like a building site, at last the design is emerging and we have some shapes!

I have to say I am incredibly pleased with it and have been internet window shopping for a bench for the bottom of the garden and arches that I may include at the sides to create two arbors for climbing plants.  I’m also hoping my landscaper can source a mill stone to sink into the patio at the entrance to the main path.  Our house used to be a granary, so although it wasn’t an actual mill, this would be a nice nod to its history.

Day 9 and the first of the four beds is completed

Day 9 - First bed layout & stone fully laid


Day 9 - Closeup of an angled basketweave corner - very pleased with how neatly it turned out


Day 9 - my stone planters make a very useful coffee table it seems!


Day 10 - Another bed almost complete - central octagon shape more evident now


Day 10 - Patio level around stone has been raised. Hoping to find a mill stone to set in centre at entrance to main path


Day 11 - View back to house, patio membrane in - more able to imagine it with the gravel in now. Have chosen a small grade Cheshire pink


Day 11 - Exciting moment when I got back from a meeting to see birdbath central feature unpacked from its crate & in place. Absolutely love it!


Day 11 - Closer view of birdbath looking back towards the house. Going to plant a hexagonal chunk of box around it


Result of my internet browsing - my DREAM bench! A 'Moot seat' named after Moot Gardens in the Wiltshire village of Downton as featured in Gertrude Jekyll's 1918 book 'Garden Ornament'. Just one problem, it's over £2,000!


My Garden Build – Picture Blog – Days 6 to 8 – Stone Henge

So, it’s going brilliantly – despite typical British summer weather and countrywide rioting! It’s been a challenging week for me and the OH who both work from home, what with (internal) builders constructing a built-in wardrobe & landscaping in the garden –  a LOT of tea making and a lot of mud & dust! ‘Lady Grey’ tea for the ‘rather particular’ builders (rolls eyes) and just plain ‘Builders’ Tea’ for the landscapers.

So on with the pictures, which reveal the ‘BIG DECISION’ over the path/bed edging pattern, a load of VERY heavy stone and some ancient Egyptian building techniques.  Hope you enjoy!

Day 6 - Setting out of beds & top end of garden cleared ready to take stone

Day 6 - Footings trenches to take large chunks of reclaimed York stone are dug


Day 6 - During trench excavation, an old beam is unearthed, sadly way too rotted to salvage, but an interesting find from our oriiginal Victorian farm building


Day 7 - Exciting moment - the reclaimed York stone arrives! John, the Boss's 2nd in command is now with us, otherwise known as 'Stumpy' after he chopped the end of his finger off with a hedge cutter - wear gloves people!!


Ok Callum, that might not be the BEST place to stand right now!


Ok, just stick it right on that pallet there please Mr Stone Delivery Man!


Yeah, right... well that stuff looks bl**dy heavy, shall we have a tea break & build up some strength ya think?


Day 7 - Well.. if it was good enough for the ancient Egyptians, it's good enough for us. Get that stone on those wooden rollers & move it!


Yo o heave ho... yo o heave ho


Day 7 - Stone laying. Now what was it Archimedes said again?


Stone laying - Calvin Klein or George at Asda? You decide!


Day 8 - Stone now in place and partially cleaned up. Does anybody EVER wear that hard hat?!!


Day 8 - the first bed edge is laid out - and the BIG DECISION is made.... we're going basket weave!!


Progressing well - ahhh lovely membrane to keeps weeds at bay


End of day 8 - 'Still Life - The Essential Landscaper'

 
Gallery

My Garden Build – Picture Blog – Days 4 & 5 – Blocks Blocks & More Blocks

This gallery contains 14 photos.

Days 4 and 5 don’t look that exciting – but work is progressing really well.   On Monday, Chris, the boss, will be sourcing our large chunks of reclaimed York stone for the patio area near the house, which he’ll clean up by … Continue reading

Gallery

My Garden Build Picture Blog – Days 1 to 3 – Minimalist

This gallery contains 24 photos.

                            Day 2 – Site Cleared & the Site Inspector calls – she approves of unearthed grubs!                     … Continue reading